Showing posts with label Internet. Show all posts

Sunday, April 26, 2020

How To Schedule Facebook Birthday Application In 3 Steps

Social media especially Facebook is most popular. With the passage of time many changes occur in it as compared to earlier. With advance and modern technology we see a no of nice applications also invent on focusing fb. Billion of users show their interest in these apps. Today I've a great idea related Facebook birthday app installation with your account. This is very popular, interesting and awesome feature.

Use of birthday application:

Many times while surfing fb you may see on your friend’s timeline a message appears some like this. “Remember to send a card……….” What’s this? Actually this is Facebook birthday reminder to its subscriber. It shows on his timeline and reminding to wish a friend. Using this way we don’t need to remember birth date, of any friend because this application schedule all our work smartly.


Features of this app:

We just need to install it remaining work is the duty of this app. Using reminder system it tells us today is our friend’s birthday. Here are some menus like comment, send card etc. if we choose first option then which words we write that directly posted on specific person’s wall.

Alternatively by choosing Send card is very famous by using this we able to send a gift, card, or any well meaning phrase to our friend on his this special occasion. Many people prefer second option because this is the modern way of wishing, celebrating and share happiness among our loved ones.

How to install birthday application:

Go to Facebook Birthday app

Step 1.

Click on OK button on dialogue appear & install application.

Step 2.

Check mark on radio button and add friends to your calendar.
Allow birthday reminders showing on your timeline.
Also permits accept requests.
Hit blue continue button for further proceed.

Step 3.

At this stage a dialogue box with all friends name appears. Simply just click on blue send requests button. As indicated in the image below.
After all click yes on receiving requests from friends.
And you are hundred percent done. Now you are able to sending and receiving birthday wishes from your added friends with a modern touch.

Need help:

Tutorial is simple however if you don’t tackle then ask us. We are here to help you. 

Sunday, April 19, 2020

Ways To Add Read More Button Or Jump Break In Blogger Post

To understand read more button you need to know a little about after jump break summary. In blogger editor there is an option which exists next to add a video option. A small symbol like cut a page! Use of this results sum up the whole post and user see only highlights on a website homepage. After writing and before publishing any post drop mouse cursor anywhere in post where you want to cut the post and use this (insert jump) option. Automatically a line breaks entire post into two pieces. Later on by visiting published post a (Raed More) link will appear exactly where we split the post. Rather then full post appearance. No doubt which is nice and good looking for easily navigation of visitors on a blog?


Read More button:

Above discussion method show a simple read more relation with blogger post. But like a professional website developer and qualified blogger post writer we want some extra and modern. So changing old link with suitable button is easy. Only requires some know how about editing template. So start here.
Go to blogger dashboard choose Template > Edit HTML.
Expand whole coding of blog in order to finding useful code. Now search for this piece of code

 Tip:

Press (ctrl+f) from keyboard a small search box will be appear paste this code here. It will find exact coding in seconds rather then manually locate in complex coding. This trick will save time and work!

Notice:

In blogger default template this code will appear more then two times. So with the purpose of exact occurrence after third alteration you see this type of code.

This is our demand. Which will be accurately above on?

Customize :

Now start playing with above code. Replace

 with Read Here or any thing you want. Press orange save button and reload page. Good you are done.

Add your own button:

Instead of showing text we can replace it with a branded button. For the sake of button preference replace

with

 Again Save template and refresh page. Text will be change with read more button.

Why summarize post:

this piece of code

There are some reasons behind this factor. Many qualified bloggers use this option because it effects on SEO.

  • When a page loads if all posts are with our read more option then it will taking more time while fully loaded. 
  • Page speed matter in search engine optimization!
  • If page take more time then expected than chances are user will leave your page and go else where. 
  • Inserting jump break will show post in gorgeous manner. 
  • Put at least five posts on home page is good practice. And not more then seven! 

Although it was an introductory tutorial regarding read more button. So stay tune with us in further decoration & customization of this button with css in upcoming tutrials.

Need help:

In finding codes are occurrence any problem ask us in comments section. We will be ready to help you.  

Saturday, April 18, 2020

Google street vision helps to view rough roads or even ice covered lakes in Mongolia

There are very selected people who are keen to visit Mongolia or who have seen it in fact but now with the help of Google Street View its possible to take a virtual tour of this country.

The Google team went to Mongolia in 2014.  The country is in Asia lying between Russia and China.  The team which was carrying street view camera on a pickup truck went to Mongolian countryside to capture views of 360 degree of the most beautiful sites.  Street view team also went off road with trekker camera strapped to the Mongolian operator.  The rig strapped camera weighed around 39 pounds.


The team of Street view was highly appreciated which provided people from different parts of the world to virtual visit some of this globe’s amazing and incredible places, which was otherwise impossible.  Street View took its audience to undersea virtual tour, to the El Capitan and many others.  The Street View team has taken the challenge to discover more interesting places and capture them on camera for viewers and so far the team has been successful enough to meet the challenge.

The most recent Street View virtual Mongolia’s tour takes its audience around 3000 miles showing its deserts, grasslands, rivers and lakes.  The country usually has over 250 sun shining days every year and for that reason it is famously called soil of the everlasting blue sky also hinted by the program manager of the Google’s team in a recently posted blog about Mongolia.

These sunny days provided lot of support to Street View team in capturing different sites of the country which included frozen surface over Khuvsgul Lake, view of the rising sun over Eastern Highway, passage beside Selenga River, barren site of Gobi desert as well as the capital city the well known Ulaanbaatar.

The virtual tour gives the option of choosing which way to go and also zooming the camera in/out with the feature of moving the cursor to any direction for getting view of every image.  It was claimed by the team’s program manager that although it takes weeks to explore the beautiful places of Mongolia but viewers can join the team for a whirlwind tour which is only a few clicks away and wished the users a very nice journey.

Wednesday, April 15, 2020

3 Ways To Add Stumbleupon Button In Blogger

Stumbleupon is one of the major social book marking network. For smoothly growth in the world of internet now it is necessary to be social. More social people who have fans in thousand and millions they establish a standard on web. Professionals use all of these resources for sake of gaining huge traffic. Pay special attention on main social sharing networks as a result it returns backlinks, real and qualified traffic and much more on you earn. On the other hand these resources give quality visitors and readers for websites. At this time we need excellence with more communal for perfect reputation. Also traffic coming from these networks i.e. stumbleupon took a unique weight in search engine eyes. So why we lost all benefits in free.


1. Stumble upon sidebar button:

In order to making more facilitation for users in a particular blog/site add variety of  standard sharing buttons including Facebook badges, Twitter follow us button , Google plus and stumble upon. Basically stumble upon is a way to recommend or oppose and sharing author’s written material with people. Consider if a user who has healthy reputation on SU he reads your content on your blog and share it via SU button. His activity gives you a flood of quality traffic more new subscribers and worth. Adding Stumbleupon button in blogger sidebar is very easy job.

  • i. Just go to Stumble upon tools section and choose favorite badge from here. Such as right or left sided bubble counting style. It is upon you but select badge according to template of your blog. 
  • ii. Now from grab it section copy the entire code. 
  • iii. Finally go to blogger Dashboard.> Layout > add a gadget > HTML Java script.
Paste the code here and leave title blank or write anything suitable. Save the new added gadget by pressing orange save button. Reload the blogger page and you will see a new version of stumble upon button is now in action. Bingo you are done. Now move for next two ways of adding stumbleupon.

2. Adding into header of blogger post:

Many time while reading articles on sites you may see social sharing buttons below the post title and just at begging the post content. Here we add stumbleupon button now. So select appropriate button and repeat above discussed process till then copy of coding. After copying whole code now follow instructions.
Go to blogger dashboard > Template > Edit HTML.
Click anywhere in source page coding an indicator will appear now press ctrl+f  a small search box will show write this piece of code in this box hit enter.
First occurrence ignore again press enter. At the second appearance yes this is our demand.
Just above it paste already copied coding and save Template by pushing orange button.
Write a new post and share it. Now you will see your button is now live at the start of blogger post content below the post title. You are done.

3. How to add below each post:

A number of bloggers prefer to use sharing buttons below every post. So don’t need to worry about how to add stumbleupon button below posts. I am here to share with you inserting this badge below post.

Follow upper discussed process. And copy fitting coding. Again go till then first three reputations of

using above mention techniques. After fourth occurrence just below it paste the code save HTML and refresh the page. All is done.

Need help:

Above discussed tutorial is simple. However in order to don’t tackle yourself or not understand able due to complex coding of your blog then let me know in commenting section. We really willing to help all of you. 

Monday, March 30, 2020

Social Floating Sharing Widget For Blogger

Every one know the importance of social networks in this age. Especially for bloggers these networks are as backbone. These major social platform like Facebook, Google plus and Twitter has a source of traffic for web owners. Suitable reputations on these stations give us worth. A number of posts we have already publishing on this topic. Skipping any detail I jump on my subject “Social floating bar”. Many time while surfing Internet you may see this sharing widget on left side in websites. New bloggers face problems while adding this gadget in HTML coding. So this is total new version of its kind. Trend of sidebar multi stylish buttons is increasing.


Why to add floating bar:

This small tool gives a new way to sharing, and tweeting a blogger post. A reliable source for spreading knowledge on all famous networks! Great user experience plus give a new glance to your web/blog. If a user finds something helpful then he shares with an easy and new style with this widget. I add most worthy platforms in this widget. A number of experiments I make with this widget since last two days. Now it is ready to releasing. This branded widget add a new taste in your  blog.

Adding widget:

Integration of this widget is very easy in 3 steps.
Go to blogger dashboard >
then choose    Layout > 
 Select    add a Gadget.
Choose HTML java script widget and paste the following coding there. Hit the orange save button and reload page. You are almost done.

Customization:

            margin-left:-690px;  change according to your page setting. Decreasing value widget will go R.H.S & increasing value gadget will move Left Hand Side.
background-color:#f7f7f7; Also if you want to change the color then replace this value by your own desired or similar color to your template. Replace data-via='technologymake' with your Twitter name.
Alternatively remains unchanged in case of insufficient knowledge of CSS.

Need Help:

Facing any type of problem ask us. We will be feel glad to help you in any nuisance. If you find this widget helpful for others then Brothers and Sisters P.s. Share it as you can.  

Top 2 Awesome Ways To Capturing Screen Shorts For Websites

If you are a writer, blogger or have any website then for teaching correctly to visitors sometimes we need screen shorts. These small cuts of screen give value to your content also a user can easily understand & pick your views. Most of the professional writers and blogger suggest putting two or three related images in your whole post while using website/blogger platform tutorials. Also you may hear an image’s worth is greater then one thousand written words. In all the above written statement this thing is same as clear bright day that using of perfect pictures is a vital step for your success in Internet community. It gives a new glance to whole post.


Why we use Images:

For better understanding. Some topics are not understandable without inserting proper images step by step. Today’s readers want clarity. Also this is a method to engaging user with topic. Without pictures visitors feel dullness and boring while reading. Plus images are a way of diverting traffic to your site/blog.

Awesome Screen Short Extension:

If you are using Google chrome browser then this is the first option to integrate with Gc. Just Go to
(chrome store) and add this extension into your browser right side. This is very nice ext because it has many options for screen capturing. Like whole page capture, selected portion and visible part of the page. After taking a short you may be able to editing this photo using its tools.

 Recapture, edit, indicate something or highlight by putting arrows and circles. Then save it in as a (.png) or Print it also save it in Goggle drive choice. Although every thing is fine but there is a little draw back of this capture. This app is only works on http:// protocol not on https:// or secure websites so we solve this problem by introducing another algorithm.

Genuine Print screen option:

You can easily take the print of your whole screen by using this technique. Locate at your keyboard to find control (ctrl) and print screen (prtsc) buttons.
Now press them together your screen short is ready. Go to start menu and find Paint tool after opening it on the left top corner there is a paste option click it and your whole screen short will be clipped to paint interface. Now by using all paint tools you can easily customize it as your own way. Add whatever, changing heights and widths if you know about paint.

Other resources:

It is recommended that use images but if you are able to make your own images then it is a good practice. By suing paint and Adobe Photoshop you’re this problem will be easily solve. Don’t use the photos from the taken by Internet because many newbies not know about their owner privacy. Professional users use Creative Commons License for their copyright reserved. Blindly using of available images form Internet may be panelized you at any stage.

Solution:

However there is another option exist for using online screen shorts of other users. If they give to write to reuse their material for complete guidance of copyrights read our () tutorial! Also you use it by giving proper credit to the creator. This is the rule. Take respect & get respect.

Thursday, March 19, 2020

How To Copy Paste Coding Of Html In Blogger Post

While writing a blogger post some time we need inserting html codes. It may be in the form of writing in block quote or any other. Even people add adsense codes directly in upper and mid section using this trick. If you don’t know about this thing then it might be create a problem for you while putting code. Alternatively if you familiar with this then it might be very easy for you! Many newbies don’t know that how they treat with this. It is necessary to get information about copying and pasting the coding in a post. So let’s get start today tutorial. Before going in detailed first we will make a short intro & purpose of adding html.


Why display html coding in post:

Well..!! Let suppose when a web developer writing a post about adding social media buttons in your blog. He makes a lot of experiments offline or at any other platform for the sake of checking. If he finds his coding is correctly with all basic aspects then he will share with their readers. At this stage he needs to copy the html coding from his note pad and paste it on blogger post.

Editing with html:

In blogger editor we see two buttons on very left upper side. First one is composed and other is html. By default in editor we use compose button for writing plain text. On the other hand if you push second one then a new interface of editor will be open. Here we see coding version of wording. If you have some know how of web language then it will be understand able that what’s the whole story? We can say this is the source of specific post. Follow the screen short instructions.

Help by html:

In this source we can make changing or editing it according to our wish. Any section of this coding you will be able to customize yourself. Copy pastes any type of code here now press compose button again. Now you will see live result of pasted html coding between plain text. We add social, demo, or other buttons by using this technique. Sometime while attaching an image in post. When we insert it then this image not goes on selected place. Even it goes upper or down. So we can set that picture by editing html coding.

Pasting of ads code:

Using affiliate networks like Adsense, Godady, programs. We encourage our readers to click on ads. If we insert ads in blogger post then chances of clicking will be increase. Many professional affiliate users insert adsense codes in middle of post by getting help with editing html. This activity boosts their earning potential & they gain more. So keep focusing on learning web language. I hope this lesson will enhance your knowledge about editing, copy and paste html coding in blogger posts. 

Sunday, March 15, 2020

Learn how to add Google translator to your blog

As we know about World’s major search engine is Google. It provides us many free tools and gadgets for the sake of facilitating users and readers. Perfect usage of tools on a blog or a website makes it popular for visitors. Also improve performance & credibility. Take live example of translator. Suppose a person from Pakistan visits the site that is in English language and his English is not very good. Also his remedy is on that website.  If the site owner already places a translator tool for their users then here are two benefits. First one is that specific person translate site’s entire content into desired language. In this way he easily understands each and every thing about what he wants. Second factor is the new random visitor fined this blog is very help full so he permanently convert into your regular user.


Why bloggers use translator:

All these small things are very important. Google translator has capability to convert hundred plus languages into one another. Although its translation is little idiomatic but a person who have some know how he understand the whole theme of the story. Give a modern and awesome look to your blog by adding standard gadgets.

Get help while writing a post:

People like me who are weak in English. Also many pro bloggers especially belongs to Pakistan they face this problem when write in English. So this is good news for all of my fellow beings I recommend whether you don’t tackle any word or phrase then refer it to
Google Translator . Here are different options for translating. Like if we want a word or phrase from Urdu language to English translate. Then we set Urdu in first column and English in its targeted or correspondence field & vice versa. There are other options from usage of these you may select other languages. Speaking and listening options are also very helpful for disable users. In short in this small application a lot of useful material and fun exist.

How to Install translator on a Blog:

Go to Blogger dashboard then select form left side menu

 Layout > Add a Gadget
After opening on new window click on Translator.

Here you will see other options like horizontal, vertical and drop down. Choose one them which is suitable and according to your blog standard. Finally hit the orange Save button. Bingo you are done. Refresh the page and see your branded new translator. Which is ready for translating site content into targeted language?

Urdu to any other language Translation Special:

There is a special package for Urdu speakers. When we translate Urdu to other targeted language translation then in first box select native language. Small drop down menu in left bottom corner appear from where you select Urdu keyboard. And then start writing your sentence or word. Easy and simple! In this way you feel using this tool incredibly enhance your vocabulary. So start using, playing and get rich your mind.

How to Stop Candy Crush Saga Notifications On Facebook

These Day I get frustrated by getting a lot of request by Facebook friends to play Candy Crush Saga on Facebook? I am sure you have also gone through that pissed off moment when people do not even send a single HI even after being your friends but their Candy Crush Request keep reminding you their existence? Well if yes then I have something great news for you. Which i tried on and now gudbye to the all notification of Candy Crush Saga.Try this method. You can actually stop getting notifications for playing Candy Crush Saga. Well how?? For that you need to just read out the whole article and all the points will be revealed one by one. Well to close the unnecessary notification of Playing Candy Crush Saga on FB, all you have to follow the steps which are given below.


Steps to Get Rid Of Candy Crush Notifications On Facebook

First of all you need to open your Facebook profile and hit the Notification option.
After that click on the candy crush notification which you had got before and point your mouse over that notification.

 As you do it, on the right side you will get two options. One is in o shape and another will be in X shape. O is for marking the notification as read and X is for turning off the notification.
Now click on that cross mark and confirm it by clicking on yes and you will not be able to get notification after that.

Hope this post will give you a huge relief and will be beneficial to you. If yes then do not forget to follow us and keep visiting our site to get new technological updates. Stay connected.

Customize Label Clouds In Blogger With Advance 5 Ways

Custom label clouds is a best way to show your all posts that tagged with specific group. Before going into depth let me give explain it. You can say that labels are those categorizes or fields where post attached. While writing a blogger post we tag it with relative grouping. In blogger there is a simple way to showing it. These joint grouping is a way to engage your reader also it decrease the bounce rate alternatively increase spending time on website. A visitor can find easily more and more stuff with the help of labels on blogger. We can place these labels in sidebar as well as in footer section. For the sake of getting additional attention from user we can customize these blogger labels from simple to attractive form. This implementation not only snatches the reader’s concentration while on the other hand it provides a new glance to your site. So let’s dive.


How to add label clouds in blogger:

If you have little experience to inserting of labels then let me tell you. It is necessary that you have posts that mark with special class. For example if you have a post about what is SEO? Then your expected tag will be search engine optimization or simply SEO. In order to showing all these type of labels at your home page of blog. Follow these instructions. Go to Layout > Add a Gadget > Select Labels >  then choose these settings as you seen in below image screenshot
Now we move forward for next step.

Customizing clouds labels in your own way:

This is the time to customizing these labels with CSS. TcM is the site which gives you vast five ways to customize according to designing of your blog. Just select your version of labels with screenshots of images in given coding and you are done. For simplicity I explain the whole procedure in 3 steps.

Go to blogger dashboard > Template > Edit HTML.
Find this piece of code  ]]></b:skin>

Select your desired coding from all of five codes that are given below and paste it to just above it. Save template and reload the page. Bingo you have a new charming look on your blog. Enjoy.

Customization:

See your style from all of above shown images an select coding.

Need help:

I know that while implementing there should be problems occurs especially who don’t tackle with coding before it. So if you face any type of difficulty or clouds labels shows improperly then ask us. It will increase our experience regarding product also way of help others. Finally show your love with sharing this tutorial and contribute to spreading knowledge for all if you can.

Monday, March 9, 2020

How To Add Social Media Buttons On Blogger Premium Version

Social media integration now a day is very compulsory for any website especially when using blogger platform. We have discussed numerous series on this specific topic. Today we will reveal another easy way to adding buttons on your website. In this tutorial you will be able to add just like your template buttons.

Premium version:

This is easy just cutting an apple. Every one whether that is new on blogger or professional implement these social icons on their blog. These icons are is a nice way to spread your work with the rest world. Also a reader feel easy while sharing a post on Facebook, Google plus or twitter. So this is the only way to make beautiful your blog by adding new gadgets like this.


Select buttons according to template:

Go to socialbuttonmaker

1. Choose buttons you what to want from huge buttons directory. Select your type by hitting choose button. As indicated in the screen short. 


A new window will be open

2. Enter only user/profile name on front of every your social profile.

3. Select the size you want to use.

4. Hit preview and check whether all buttons are working properly. 

Now you have half done.

Adding HTML Java script:

5. Copy the code from the iframe. 

And put into adding a gadget on your bloggerwhere you want to render.
Finally refresh the page and see the live preview of your social media icons.
Congratulations..!!! You have done. Put your blog appearance to a new advance level and make impression for your readers.

Need help:

If you don’t tackle or feel help at any stage then we are here just ask. We hope you like this easy and one way tutorial please show your love in comments. J  

Sunday, March 8, 2020

How To Increase Alexa Website Traffic Rank +Widget

Alexa is a web information company from Amazon. Which provides knowledge about sites on the internet by using its algorithm? This is the time to know about latest development in search engine optimization. With respect to SEO this site may help you in right dimension. Checking randomly your own site statistics from Alexa! It determines which part of site need to improvement for pick up better results in search engine. Also enhance stability of site in searches with legal & permissible manner. Such as your global ranking, links in, and specific set country status. As we mention these all terminologies in our already published post of installation of Alexa extension in Google Chrome. So here skip these steps. It is recommended first check that post. Now roll on.


Installation of Alexa toolbar:

This website notes impressions and clicks when a visitor landing on Alexa by using your toolbar. It also increases site ranking. Your first step to create an account or sign up then make a custom toolbar hit green button by giving all of your pages like Facebook, Twitter, Home page and search links. Plus RSS feed button. When happy with toolbar take a preview after looking good then hit the publish button.

Alternatively try to (download TcM toolbar)  directly. Install it to your browser and feel a new glance while surfing Internet. On the other hand you may easily configure Tcm toolbar by hitting this icon.
Get our toolbar!

Install it and start using with less risk & full confidence. This feature will surely help you in boosting your site traffic and ranking in search engine eye. For further assistance you may go on  Alexa FAQS.

Addition of Widgets:

Another great way to amplifying the site is add widgets by using this link go to widgets section. Three types of gadgets are available there.

  • Site status button.
  • Traffic rank button for site owners.
  • Graphical representation of website data. 

Select any one then insert desired address in address bar then hit the orange bild widget button. Select javascript code which you want now follow these instructions.
Go to blogger dashboard > Layout > Add a gadget > HTML Java script.
Paste code here don’t tackle then read this tutorial first how to add blogger gadgets then implement. After that hit save button! Refresh page now you are Ok.
Alternatively there is another option also exist. Use logo in order to linking or referring to alexa!

Bonus Tip:

Write at least one healthy post about alexa and publish it on your website or blogger. Then changes will you see & feel.

Sunday, March 1, 2020

How To Install A Free License From Creative Commons For Blog And Website

As we write in detail in our previous topic about understand the facts of copyrights. So this is the right time we approve our site from Creativecommonsfree license ship. This is very easy process & we suggest every one who has their own blog or website this is very useful weapon. Also it is a firewall against spammers. So protection is in your hand. Now let’s dive.


Features:

At creativecommons we see some different sign the meaning and purpose of each fig discussed in detail below.

1. The main logo of CC:

 This logo appears on each license and verifies your creativity.CC license consist on three different layers.
First one is general layer and encloses special codes & languages.Second layer is all about for human readable. With important information about owner of the copyrights whether that is a composer, writer, etc. Third layer is for search engine friendly with essential description of license
.
With  No attribute:

This sign tell us about the behavior of owner with choice.
 In more depth this shows that licenser permits their work from copy, share but not distribute the next coming work on its behalf.

Yes atrribute:

About this specific sign owner allows to share his work, and with yes Tag.

For commercial and personal:

If this attribute appears on any license then reader may easily understand that owner do not allow their work for commercial use. On the other hand if not then you are free for both comm and personal usage.

How to install creative commons license:

So now the time to getting license and show it to your blog or website. With step by step guidance.Allow yes in first radio button as in the figure below marked and don’t allow for commercial usage.

In Title may use name of organization or what you want.
 Attributor section filled with owner or author name. Provide a URL of your page and choose HTML+RDF
In final step copy the code with Normal icon and go to
Blogger Dashboard > Layout >  Add aGadget

And copy this code into HTML Java script. Press save arrangement orange button at top right and refresh the page.

 Bingo you are done Your Creative Commons license is now alive and you are now safe.

Sunday, February 23, 2020

2 New Ways To Show Popular Posts Gadgets On Blogger

Keeping users engage in blog is the desire of every author. This is not an easy way. How ever making changes in our template we can increase the page views, impressions and clicks on our blog. It is a trick. Also using advertising programs we need these things to enhance for making handsome revenue. Installing popular post widget is a technique to improving all this stuff easily. Besides above discussed features this gadget gives the full access to a reader for exploring trendy and helpful content to read & utilized.


#1. Installation on sidebar:

In first session we add this widget at side bar of a blog. For the sake of implementation let’s roll over. Go to Dashboard of blogger > Layout > Add a gadget. When click on Add a gadget a new window will appear select popular posts from entire category then make suitable changes.

In title section give suitable name like “Most wanted” or “Recommended by Tcm” Whatever but given name should be short and descriptive.
In most viewed part choose all time button. Show settings leave these two buttons as “un mark”. Because if we mark them then on sidebar posts images and headings will appear!
Finally set display option minimum 10.

#2. Adding Popular widget in Footer:

When a user scrolling down and he reaches at bottom of your blog. In other words in the footer section! If you apply this widget here then chances is increase page views credibility. This gives a perfect touch & glance to footer.

Recommended custom settings:

By adopting sidebar setting when you reach at popular post widget to add then do these settings for better results.
Give an attractive & appropriate label.
Choose all time seen preference.
In settings menu check mark these two options. As indicated into screen short! Footer is fit for showing related image thumb nail. With ten posts.

Tuesday, February 18, 2020

How Students Earn Money With Infolinks In 2014 Part-1

In this age on the Internet almost many advertising companies are active. Most of them are scam but there are really such networks which give the opportunity to earning money online.  A large number of males, females or house wives are working with these systems. Today we are especially focus on students. How they make handsome cash with out disturbing their studies. I know very well they have lack of time but we present a schedule for management. Also at this stage youngsters fulfill their needs but most of them are failing to do so. Here is a golden chance for all of you work together with Infolinks in 2014 with global network.


Requirements:

                          There are some compulsory rules and laws of advertising with such networks. A well manage website or Blog about any topic. Which is eligible for ads & also that complies with positive policies of these advertising companies. At least 20 to 30 posts your blog have.

Approval from Infolinks:
                                 
                          When you have owner of all above discussed items then its right time for applying. In order to get pass this test follow these simple tricks. Another vital step for your approval is smart SEO of you Blog and huge traffic. These factors give us the opportunity to earn more money in 2014 with this world wide network. Now read carefully.
                                       
    Go to (www.infolinks.com) fill registration form in order to get Sign up. You have an option to join this network with Facebook account. Once you get an account then next process is so easy. Select Log in Publisher tab for the sake of monetizing. Do not choose advertiser.

Infolinks for Publishers:

                                         Tag, frame, text and search are four ways to integrate your blog or website with all of them. Choose all earn more. eCPM(effective cost per thousand views) & Ad or Net page views on your site by unique visitors. On the basis of these two categories this Infolinks gives your earning money in weekly report.

Payments:

                   According to this network these are all ways to get your money in Pakistan. Western Union, Paypal, Payoneer and Bank wire transfer system. You made payment request when you reach minimum Threshold $$50.

Summary:

                 We encourage the students to join this field. However it was just introductory class about earning money with infolinks in 2014. Asp I will try to discuss remaining part with all of you guys in the sense of getting full benefit. So stay tuned and keep visiting for latest updates.
Recommended How to make money online.                        

The HTML Java Script Widget Most Useful Tool

HTML Java script widget in blogger is commonly useful in many aspects. Since blogger is a foremost platform at internet. A number of people give preference it.  Its settings are very easy to understand. As a blogger we need to add & remove gadgets on daily basis. Such that up & down in this series of


template is continues. We insert these widgets for keeping readers up to date with daily new stuff and adjustment in blogger template appearance. Some works fit and some dose not work due to many reasons i.e. problem in codings not inserted properly etc. A gadget allows us to take effect and changes instantly as long as we hit save button and reload page. If it seems good then it will survive alternatively removal option is still in reserve.

Most useful widget:

To be personal I found that HTML Java script widg is one of those which is regularly use at blogger by people. Because it gives us just copy the code from anywhere you want it and paste. Title is optional. It is moveable and after saving it you may place it as your choice. Let me tell you if a wid that you want to display in sidebar i.e. floating social icon section & originally widget is at header section. Then after putting the code in it click on it by mouse left button hold on pressing and bring it at your destination place in template.

Where we use HTML Java script gadget:

While placing a code such as from adsense, Facebook Badge or Twitter Button. Even for every single piece of code we add HTML Java script. In previous post Iintroduce mashable version of social icons. While adding these buttons we need this special widget that is built in blogger. It is a simple and neat way to adding any type of code in template as compared to finding exact location in complex edit template section which is very hard for especially newly bloggers. Saving time is another profit from it.

How to find:

Go to blogger dashboard > Layout > Add a Gadget > Choose HTML Java Script as mention in screen short.

Just click on plus button add code in it and you are done.  Same is the procedure of its deletion. Just click on remove button it will be deleted. 

How Add Watermark On Blogger Images By Picasa 3 Google

Technology enhances with latest updates developments. In every field of internet we see suitable changes are coming as time passes. On the other hand where all these facilities are for human benefit but crackers, hackers and spammers also growing using modern techniques. In this time whether you are web developer, a photo editor, or photographer you need to protect your property online. Save photos with watermark (WM)by picasa. As a blogger for sake of better understanding we require to upload photos or screenshorts. This activity helps readers while reading a blogger post plus it added a new taste to a specific post. Another positive point arises here that inserting of pictures prevent users from boring during studying.


What is watermark:

It is possible this term will be new for a number of internet users or newbies. Watermark is a way to add your own caption or copyright on the photo. Moreover it provides necessary information about author and image. Different options, fonts, size and colors you may choose while adding watermark using Google application picasa 3. This is best practice & recommended by professional photographers.

Google picasa 3 :

A free tool for editing images, with high quality production. Download here. I’m not going in depth for explaining it but some really awesome features we touch. Photo processing option with latest editing and direct sharing preferences are extremely good. After setting photos if you are satisfied then directly upload to picas web album. Tons of images we save here for any purpose.

How to add:

After installing this application start it and follow these steps for inserting WM.

1. Go to Export option as indicated in screen short.
2. Then Check mark add watermark setting.
3. Write what do you want.

In writing field it is suggested that point out something about image & author. Inserting about copyrights is pretty good selection.
Save picture and you are done.

Summary:

Smaller is better. All these little exercises enhance experience of better surfing of internet. With increasing knowledge! WM is necessary. Online a large number of resources exist regarding this addition. But choice of Google picasa 3 is superb. As time passes if you are using this app then you may find other secrets.  

Tuesday, February 11, 2020

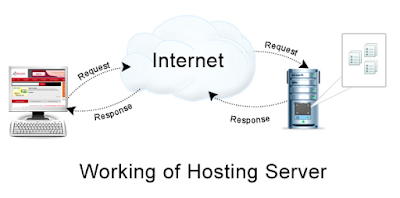
What is Server and How it Works ?

Have you ever thought how the servers work? How these WebPages deliver to us? How we get so many results of a single question? Well if no, then it is the right time to get all the answers related to such kind of questions. Well I guess we all know how to rule the web but I doubt half of us would be aware of the mechanisms which makes things (sending WebPages to us and showing lots of result of a particular question) possible. Well i am sure that most of you would love to know about it that is why here we are to explain you the mechanisms of a server, we will tell you the process of a server. In short you will get to know how a server works.


Well if we dig this topic then I am sure that your curiosity to know more about it will definitely increase. Okay now just take an example. Well let assume that you are working on the web, trying to open a page by entering its URL (URL stands for Uniform Resource Locator). When you do it, on the very nexct6 moment the respective page appear on the display. It hardly takes 23 to 24 seconds. Isn’t it so inquisitive? I know it is but how many of you have fascinated about its implementation? Well if you are one of them who wanted or want to know about it then we assure you that it is the right place from where you can find out all the necessary details plus the mechanisms which make it happen.

We are going to provide you the complete details in simple steps kindly go through it. And we are sur4e that you will have a great amount for information after reading this article.

How it starts –

Well whenever you enter any URL into Google chrome, the respective page pops up on the screen without taking so much of time. I must say that technology has made things quite easier and saves a lot of time. But the real question is what made it happen? Well the answer is Google chrome constructed a connection to a Web server and then requested a page and to the second moment your request pops on your page.

Let’s make its bit more Understandable and extensive –

Well in the first paragraph we gave you the details regarding how server works? But here we will tell you its mechanisms extensively. Well behind the scenes what happened is as same as the steps given below.

  • The browser broke the URL into three parts.
  • The protocol (“http”)
  • The server name (“www.howstuffworks.com”)
  • The file name (“web-server.htm”)
  • The browser came in contact with a name server to translate the server name “www.howitworks.com” into a unique IP Address, which helps it to connect with the server machine.
  • After it the Google Chrome made a connection to the server at that IP address on port 80.
  • The browser sent a GET request to the server, asking for the file “http://www.howitworks.com/web-server.htm.” after following the HTTP Protocol.
  • After that the server then sent the HTML text for the Web page to the Chrome.
  • Chrome read the HTML tags and makes it possible to pop up that respective page on the screen.

Sunday, February 9, 2020

Learn How To Add Facebook Like Box On Blogger

Every blogger know the importance of social media. Especially Facebook and twitter are now most familiar in the world. According to a suitable estimate if we divide the whole world population into three parts then every 2nd person is Facebook user! This is the worth of social media.

Social Plugins:

                       These social media platform help to add variety of buttons including like box, like button, share button, embed option, follow, comment and recommended box. It is upon your choice that what you would select to adding on blog? This is the complete series. And we will try to write comprehensive post on this entire Fb buttons series. You can say this is first the episode.


Insert Like box:

                         First of all you have a well managed social page on Fb. After that just go to
          (Facebook Developers page).
Here we see four types of like Page URL, Width, height, and light.

Facebook Page URL:

                                In this box enter your own page address as in the image described. After entering the address presses enter you will see your own page now.

insert your own facebook address here

Customization:

                        Adjust your own color scheme, height and width if you want. Otherwise leave them default.
 You may see four radio buttons
Show friend faces.
Show header.
Show post.
Show border

Check mark on no 1 will show the faces of those who like page. Header button hide & show page name. If you want border then select if doesn't then leave it empty.

Implementation of Like box or Iframe:

                                                              Finally after these settings click on left side blue button and get code of your like box. A dialogue box appears with four different options select Iframe for better easy and quick response. Copy the code and add it to on your blog.

How to add on blog:

Go to blogger dashboard > Layout
and add a new gadget. By selecting Gadget> HTML Java script  from widgets.
Must See How to Add A Gadget in Blog.
Paste the code with suitable title and hit save. Bingo you are done. Refresh the page for the confirming. Is Facebook like box appears as you want?

Social Floating Bar For Blogger Version 2

               In previous post of social floating widget for blogger we share commonly use social buttons. May be you notice this thing or not but after releasing this floating bar a number of TcM readers ask us to share a widget containing Buffer, LinkedIn and Pocket buttons. So keeping in view there demand also making some other changes is aim to release this social floating bar. As we know that with every moment of time new bloggers are coming. And every day it has been seen hundreds are blogs created. Every one wants to garnish his site with multi stylish buttons and look good in the race of blogging. So on one side where this widget will fulfill their ambition regarding dress up the blog alternatively it is a good way to distribute your site on different social channels.


Specifications:

               This is branded widget in its kind with addition of Pocket, LinkedIn and Buffer social plug-in. Pocket is an application which allows you to book mark something like a post, website, a special page etc. If a user finds any thing helpful then he easily book mark that page for future concerns. Similarly spreading information among professionals that are in your connection at LinkedIn this plug in gives you all in one package.

Buffer App:

              Buffer is an application which allows to automate your content on all social pages. It is very easy and professionals recommend this app. It is also available in Chrome, Firefox extensions. However in order to minify complexity now you use it in social sharing floating bar as a button. Also in this present gadget after its installation your readers will be able to share content using buff. The method of this application is straightforward. Just press the button and it press the whole post with thumbnail and link. After completion post will be share on your connected social profiles.

How to add:

Go to dashboard > select Layout > add a gadget
Select a new widget then copy whole coding from here

and paste entire coding inside it.
Save the gadget. You are done.

Customization:

            The default setting according to blogger non customized templates. However if you are using other templates and social plug in not adjusted properly then change the   margin-left:-721px;      according to accurate resemblance.

             Also if  back ground colour of  your blog is other then the colour of plug in then you can change it from this     background-color:#ddd; highlighted piece of code.

Need help:

             In case of don't tackle or facing any error while adding this social floating bar you may ask us in comment section. We are ready to help you. :)